On this page
GitHub integration
SonarQube's integration with GitHub Enterprise and GitHub.com allows you to maintain code quality and security in your GitHub repositories.
With this integration, you'll be able to:
- Import your GitHub repositories: Import your GitHub repositories into SonarQube to easily set up SonarQube projects.
- Analyze projects with GitHub Actions: Integrate analysis into your build pipeline. Starting in Developer Edition, SonarScanners running in GitHub Actions jobs can automatically detect branches or pull requests being built so you don't need to specifically pass them as parameters to the scanner.
- Report your quality gate status to your branches and pull requests: (starting in Developer Edition) See your quality gate and code metric results right in GitHub so you know if it's safe to merge your changes.
- Authenticate with GitHub: Sign in to SonarQube with your GitHub credentials.
- Display code scanning alerts for vulnerability issues in GitHub: Display security vulnerability issues found by SonarQube as code scanning alerts in the GitHub interface.
Prerequisites
If you're using GitHub Enterprise, we recommend using GitHub Enterprise version 3.4+.
Branch analysis
Community Edition doesn't support the analysis of multiple branches, so you can only analyze your main branch. With Developer Edition, you can analyze multiple branches and pull requests.
Importing your GitHub repositories to SonarQube
You need to use a GitHub App to connect SonarQube with GitHub and import your GitHub repositories into SonarQube. This is also the first step in adding authentication, and, starting in Developer Edition, the first step in reporting your analysis and quality gate status to your pull requests.
If you want to set up authentication without importing your GitHub repositories, see the Creating a dedicated app for authentication section below for instructions on setting up authentication.
In this section, you'll complete the following steps to connect SonarQube and GitHub with a GitHub App:
- Create your GitHub App.
- Install your GitHub App in your organization.
- Update your SonarQube global settings with your GitHub App information.
Step 1: Creating your GitHub app
See GitHub's documentation on creating a GitHub App for general information on creating your app.
Specify the following settings in your app:
- GitHub App Name: Your app's name.
- Homepage URL: You can use any URL, such as
https://www.sonarqube.org/. - User authorization callback URL: Your instance's base URL. For example,
http://sonarqube.yourcompany.com. Note that for this to work, your SonarQube instance must be accessible through a public URL. - Webhook URL: To improve security, webhooks, by default, are not allowed to point to the SonarQube server since version 8.9LTS, therefore we recommend that you disable the feature. Unless you want to enable code scanning alerts for security vulnerabilities in GitHub, you should clear the Webhook Active checkbox to silence a forthcoming deprecation warning, and clear the Webhook URL and Webhook secret fields when creating your GitHub App.
- Grant access for the following Repository permissions:
| Permission | Access |
| Checks | Read & write |
| GitHub Enterprise: Repository metadata GitHub.com: Metadata (this setting is automatically set by GitHub) | Read-only |
| Pull Requests | Read & write |
- For private repositories, grant access to the following Repository permissions:
| Permission | Access |
| Contents | Read-only |
- If setting up GitHub Authentication, in addition to the aforementioned Repository permissions, grant access for the following Account permissions:
| Permission | Access |
| Email addresses | Read-only |
- And grant access for the following Organization permissions:
| Permission | Access |
| Members | Read-only |
| Projects | Read-only |
- Under "Where can this GitHub App be installed?," select Any account.
For security reasons, make sure you're using HTTPS protocol for your URLs in your app.
Step 2: Installing your GitHub app in your organization
Next, you need to install your GitHub App in your organization. See GitHub's documentation on installing GitHub Apps for more information.
Step 3: Updating your SonarQube global settings with your GitHub app information
After you've created and installed your GitHub App, update your global SonarQube settings to finish integration and allow for the import of GitHub projects.
Navigate to Administration > Configuration > General Settings > DevOps Platform Integrations > GitHub and specify the following settings:
- Configuration Name (Enterprise and Data Center Edition only): The name used to identify your GitHub configuration at the project level. Use something succinct and easily recognizable.
- GitHub URL: For example,
https://github.company.com/api/v3for GitHub Enterprise orhttps://api.github.com/for GitHub.com. - GitHub App ID: The App ID is found on your GitHub App's page on GitHub at Settings > Developer Settings > GitHub Apps.
- Client ID: The Client ID is found on your GitHub App's page.
- Client secret: The Client secret is found on your GitHub App's page. Administrators can encrypt this secret at Administration > Configuration > Encryption. See the Settings Encryption section of the Security page for more information.
- Private Key: Your GitHub App's private key. You can generate a
.pemfile from your GitHub App's page under Private keys. Copy and paste the whole contents of the file here. Administrators can encrypt this key at Administration > Configuration > Encryption. See the Settings Encryption section of the Security page for more information.
Analyzing projects with GitHub Actions
SonarScanners running in GitHub Actions can automatically detect branches and pull requests being built so you don't need to specifically pass them as parameters to the scanner.
To analyze your projects with GitHub Actions, you need to:
- Create your GitHub Secrets.
- Configure your workflow YAML file.
- Commit and push your code to start the analysis.
Creating your GitHub secrets
You can create repository secrets from your GitHub repository. See GitHub's documentation on Encrypted secrets for more information.
You need to set the following GitHub repository secrets to analyze your projects with GitHub Actions:
- Sonar Token: Generate a SonarQube token and, in GitHub, create a new repository secret in GitHub with
SONAR_TOKENas the Name and the token you generated as the Value. - Sonar Host URL: In GitHub, create a new repository secret with
SONAR_HOST_URLas the Name and your SonarQube server URL as the Value.
Configuring your .github/workflows/build.yml file
This section shows you how to configure your .github/workflows/build.yml file.
You'll set up your build according to your SonarQube edition:
- Community Edition: Community Edition doesn't support multiple branches, so you should only analyze your main branch. You can restrict analysis to your main branch by setting it as the only branch in your
on.push.branchesconfiguration in your workflow YAML file, and not usingon.pull_request. - Developer Edition and above: GitHub Actions can build specific branches and pull requests if you use
on.push.branchesandon.pull-requestsconfigurations as shown in the examples below.
Click the scanner you're using below to expand the example configuration:
SonarScanner for Gradle
Note: A project key might have to be provided through a build.gradle file, or through the command line parameter. For more information, see the SonarScanner for Gradle documentation.
Add the following to your build.gradle file:
plugins {
id "org.sonarqube" version "3.5.0.2730"
}Write the following in your workflow YAML file:
name: Build
on:
  push:
    branches:
      - main # the name of your main branch
  pull_request:
    types: [opened, synchronize, reopened]
jobs:
  build:
    name: Build
    runs-on: ubuntu-latest
    steps:
      - uses: actions/checkout@v2
        with:
          fetch-depth: 0  # Shallow clones should be disabled for a better relevancy of analysis
      - name: Set up JDK 11
        uses: actions/setup-java@v1
        with:
          java-version: 11
      - name: Cache SonarQube packages
        uses: actions/cache@v1
        with:
          path: ~/.sonar/cache
          key: ${{ runner.os }}-sonar
          restore-keys: ${{ runner.os }}-sonar
      - name: Cache Gradle packages
        uses: actions/cache@v1
        with:
          path: ~/.gradle/caches
          key: ${{ runner.os }}-gradle-${{ hashFiles('**/*.gradle') }}
          restore-keys: ${{ runner.os }}-gradle
      - name: Build and analyze
        env:
          GITHUB_TOKEN: ${{ secrets.GITHUB_TOKEN }}  # Needed to get PR information, if any
          SONAR_TOKEN: ${{ secrets.SONAR_TOKEN }}
          SONAR_HOST_URL: ${{ secrets.SONAR_HOST_URL }}
        run: ./gradlew build sonar --info
SonarScanner for Maven
Note: A project key might have to be provided through the command line parameter. For more information, see the SonarScanner for Maven documentation.
Write the following in your workflow YAML file:
name: Build
on:
  push:
    branches:
      - main # the name of your main branch
  pull_request:
    types: [opened, synchronize, reopened]
jobs:
  build:
    name: Build
    runs-on: ubuntu-latest
    steps:
      - uses: actions/checkout@v2
        with:
          fetch-depth: 0  # Shallow clones should be disabled for a better relevancy of analysis
      - name: Set up JDK 11
        uses: actions/setup-java@v1
        with:
          java-version: 11
      - name: Cache SonarQube packages
        uses: actions/cache@v1
        with:
          path: ~/.sonar/cache
          key: ${{ runner.os }}-sonar
          restore-keys: ${{ runner.os }}-sonar
      - name: Cache Maven packages
        uses: actions/cache@v1
        with:
          path: ~/.m2
          key: ${{ runner.os }}-m2-${{ hashFiles('**/pom.xml') }}
          restore-keys: ${{ runner.os }}-m2
      - name: Build and analyze
        env:
          GITHUB_TOKEN: ${{ secrets.GITHUB_TOKEN }}  # Needed to get PR information, if any
          SONAR_TOKEN: ${{ secrets.SONAR_TOKEN }}
          SONAR_HOST_URL: ${{ secrets.SONAR_HOST_URL }}
        run: mvn -B verify org.sonarsource.scanner.maven:sonar-maven-plugin:sonar
SonarScanner for .NET
Write the following in your workflow YAML file:
name: Build
on:
  push:
    branches:
      - main # the name of your main branch
  pull_request:
    types: [opened, synchronize, reopened]
jobs:
  build:
    name: Build
    runs-on: windows-latest
    steps:
      - name: Set up JDK 11
        uses: actions/setup-java@v1
        with:
          java-version: 1.11
      - uses: actions/checkout@v2
        with:
          fetch-depth: 0  # Shallow clones should be disabled for a better relevancy of analysis
      - name: Cache SonarQube packages
        uses: actions/cache@v1
        with:
          path: ~\.sonar\cache
          key: ${{ runner.os }}-sonar
          restore-keys: ${{ runner.os }}-sonar
      - name: Cache SonarQube scanner
        id: cache-sonar-scanner
        uses: actions/cache@v1
        with:
          path: .\.sonar\scanner
          key: ${{ runner.os }}-sonar-scanner
          restore-keys: ${{ runner.os }}-sonar-scanner
      - name: Install SonarQube scanner
        if: steps.cache-sonar-scanner.outputs.cache-hit != 'true'
        shell: powershell
        run: |
          New-Item -Path .\.sonar\scanner -ItemType Directory
          dotnet tool update dotnet-sonarscanner --tool-path .\.sonar\scanner
      - name: Build and analyze
        env:
          GITHUB_TOKEN: ${{ secrets.GITHUB_TOKEN }}  # Needed to get PR information, if any
        shell: powershell
        run: |
          .\.sonar\scanner\dotnet-sonarscanner begin /k:"example" /d:sonar.token="${{ secrets.SONAR_TOKEN }}" /d:sonar.host.url="${{ secrets.SONAR_HOST_URL }}"
          dotnet build
          .\.sonar\scanner\dotnet-sonarscanner end /d:sonar.token="${{ secrets.SONAR_TOKEN }}"
SonarScanner CLI
You can easily set up a basic configuration using the SonarQube Scan GitHub Action. You'll find the GitHub Action and configuration instructions on the SonarQube Scan GitHub Action page on the GitHub Marketplace.
Failing the pipeline job when the quality gate fails
You can use the SonarQube quality gate check GitHub Action to ensure your code meets your quality standards by failing your pipeline job when your Quality gate fails.
If you do not want to use the SonarQube quality gate Check Action, you can instruct the scanner to wait for the SonarQube quality gate status at the end of the analysis. To enable this, pass the -Dsonar.qualitygate.wait=true parameter to the scanner in the workflow YAML file.
This will make the analysis step poll SonarQube regularly until the quality gate is computed. This will increase your pipeline duration. Note that, if the quality gate is red, this will make the analysis step fail, even if the actual analysis itself is successful. We advise only using this parameter when necessary (for example, to block a deployment pipeline if the quality gate is red). It should not be used to report the quality gate status in a pull request, as this is already done with pull request decoration.
You can set the sonar.qualitygate.timeout property to an amount of time (in seconds) that the scanner should wait for a report to be processed. The default is 300 seconds.
Commit and push your code
Commit and push your code to start the analysis. Each new push you make on your branches or pull requests will trigger a new analysis in SonarQube.
Reporting your quality gate status in GitHub
After creating and installing your GitHub App above, SonarQube can report your quality gate status and analysis metrics directly to your GitHub branches and pull requests.
To do this, add a project from GitHub by clicking the Add project button in the upper-right corner of the Projects homepage and select GitHub from the drop-down menu.
Then, follow the steps in SonarQube to analyze your project. SonarQube automatically sets the project settings required to show your quality gate in your branches and pull requests.
To report your quality gate status in your branches and pull requests, a SonarQube analysis needs to be run on your code. You can find the additional parameters required for pull request analysis on the Pull Request Analysis page.
If you're creating your projects manually or adding quality gate reporting to an existing project, see the following section.
Reporting your quality gate status in manually created or existing projects
SonarQube can also report your quality gate status to GitHub pull requests and branches for existing and manually-created projects. After you've created and installed your GitHub App and updated your global DevOps Platform Integration settings as shown in the Importing your GitHub repositories into SonarQube section above, set the following project settings at Project Settings > General Settings > DevOps Platform Integration:
- Configuration name: The configuration name that corresponds to your GitHub instance.
- Repository identifier: The path of your repository URL.
Advanced configuration
Reporting your quality gate status on pull requests and branches in a mono repository
Reporting quality gate statuses to branches and pull requests in a mono repository setup is supported starting in Enterprise Edition.
In a mono repository setup, multiple SonarQube projects, each corresponding to a separate project within the mono repository, are all bound to the same GitHub repository. You'll need to set up each SonarQube project that's part of a mono repository to report your quality gate status.
You need to set up projects that are part of a mono repository manually as shown in the Reporting your quality gate status in manually created or existing projects section above. You also need to set the Enable mono repository support setting to true at Project Settings > General Settings > DevOps Platform Integration.
After setting your project settings, ensure that the correct project is being analyzed by adjusting the analysis scope and pass your project names to the scanner. See the following sections for more information.
Ensuring the correct project is analyzed
You need to adjust the analysis scope to make sure SonarQube doesn't analyze code from other projects in your mono repository. To do this set up a Source File Inclusion for your project at Project Settings > Analysis Scope with a pattern that will only include files from the appropriate folder. For example, adding ./MyFolderName/**/* to your inclusions would only include code in the MyFolderName folder for analysis. See Narrowing the focus for more information on setting your analysis scope.
Passing project names to the scanner
Because of the nature of a mono repository, SonarQube scanners might read all project names of your mono repository as identical. To avoid having multiple projects with the same name, you need to pass the sonar.projectName parameter to the scanner. For example, if you're using the Maven scanner, you would pass mvn sonar:sonar -Dsonar.projectName=YourProjectName.
Showing your analysis summary under the GitHub Conversation tab
By default, Enable analysis summary under the GitHub Conversation tab is on and your pull request analysis will be shown under both the Conversation and Checks tabs in GitHub. When off, your pull request analysis summary is only shown under the Checks tab.
Configuring multiple DevOps platform instances
SonarQube can report your quality gate status to multiple DevOps platform instances. To do this, you need to create a configuration for each DevOps Platform instance and assign that configuration to the appropriate projects.
- As part of Developer Edition, you can create one configuration for each DevOps Platform.
- Starting in Enterprise Edition, you can create multiple configurations for each DevOps Platform.
Linking issues
When adding a quality gate status to your pull requests and branches, individual issues will be linked to their SonarQube counterparts automatically. For this to work correctly, go to Administration > Configuration > General Settings > General > General to set the instance's Server base URL. Otherwise, the links will default to localhost.
Preventing pull request merges when the quality gate fails
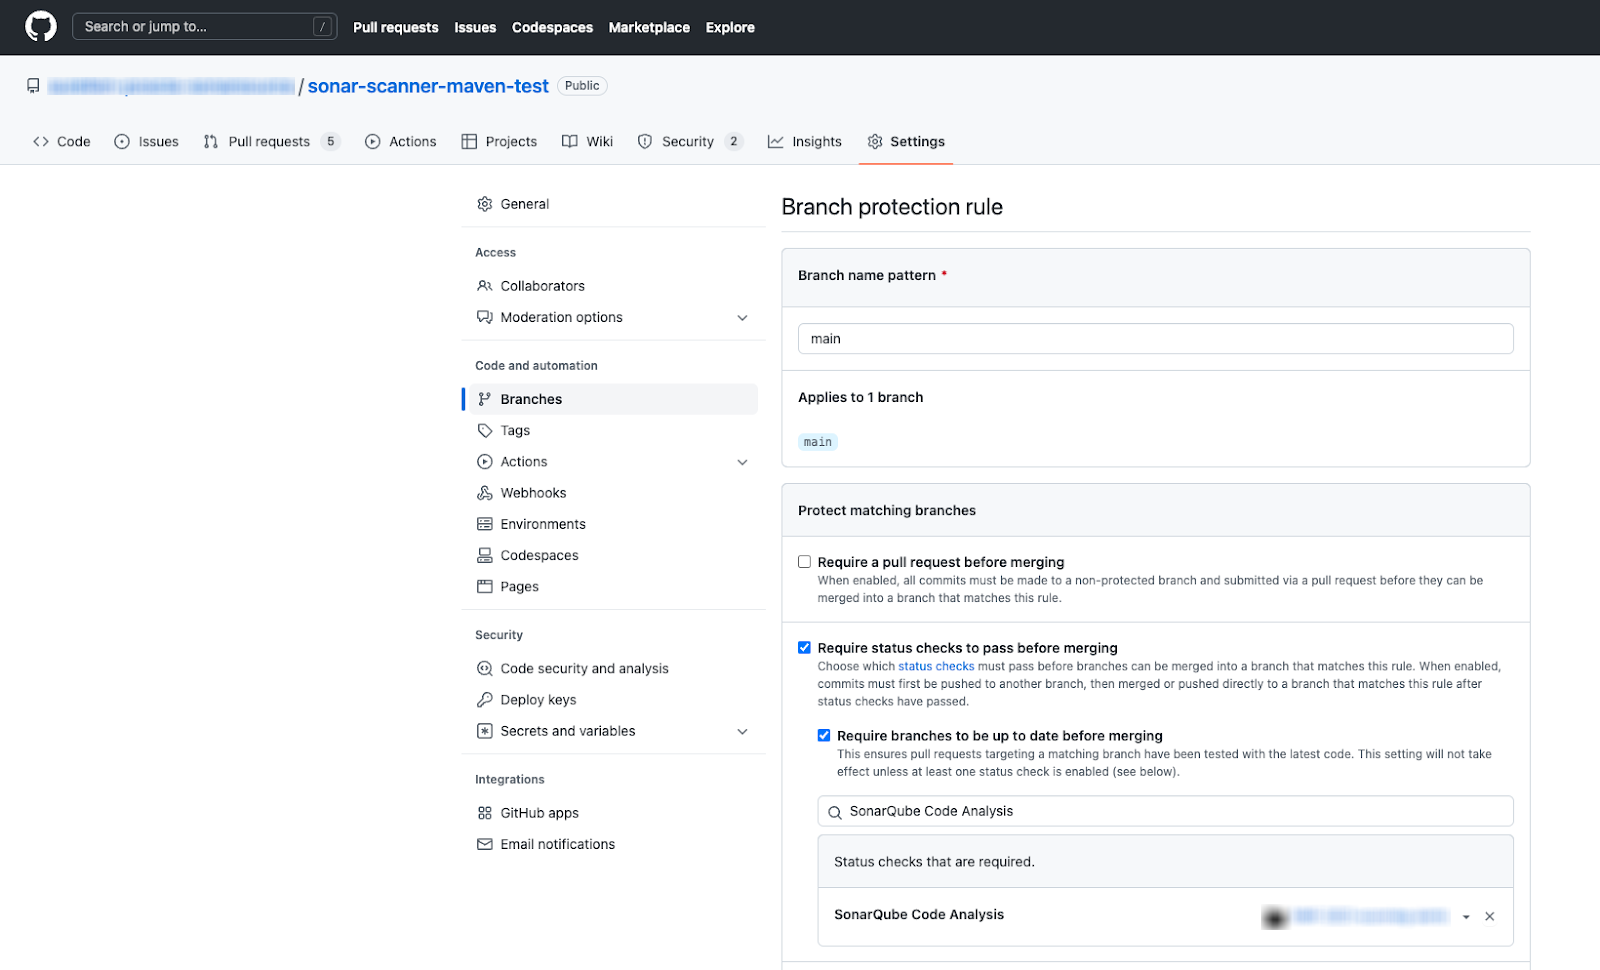
In GitHub, you can block pull requests from being merged if it is failing the quality gate. To do this:
- In GitHub, go to your repository Settings > Branches > Branch protection rules and select either the Add rule or Edit button if you already have a rule on the branch you wish to protect.
- Complete the Branch protection rule form:
- Define the Branch name pattern (the name of the branch you wish to protect)
- Select Require status checks to pass before merging to open supplementary form fields.
- In the Search for status checks in the last week for this repository field, select Require branches to be up to date before merging, then find
SonarQube Code Analysisand add it to the list of required checks.

Authenticating with GitHub
See Authenticating with GitHub for more details on your authentication settings in GitHub.
GitHub code scanning alerts for security vulnerabilities
Starting in Developer Edition, SonarQube can provide feedback about security vulnerabilities inside the GitHub interface itself. The security vulnerabilities found by SonarQube will appear in both:
- The SonarQube interface, as part of the displayed analysis results.
- The GitHub interface, as code scanning alerts under the Security tab.
Note: This feature is part of the GitHub Advanced Security package and is currently free for public projects. It is available as a paid option for private projects and GitHub Enterprise. This option is entirely on the GitHub side. Sonar does not charge anything extra to enable the code scanning alerts feature.
Before you can configure GitHub code scanning alerts for vulnerability issues, you must first import your GitHub repository to SonarQube as explained above.
Once you've enabled this feature, you must run a SonarQube analysis to see your security vulnerabilities as GitHub code scanning alerts.
Configuring GitHub
- Go to Settings > Developer settings > GitHub Apps and select your GitHub App.
- Go to the General > Webhook section and make sure to select the active checkbox.
- Add the following Webhook URL:
https://<yourinstance>.sonarqube.com/api/alm_integrations/webhook_github. Replace<yourinstance>.sonarqube.comwith your SonarQube instance. - Set a Webhook secret (see GitHub's webhook security recommendations).
- Under Permissions & events > Repository permissions > Code scanning alerts, set the access level to Read and write. When you update this permission, GitHub sends an email to the GitHub organization's administrator, asking them to validate the changes on the installation of the GitHub App.
- Under Permissions & events > Subscribe to events, select Code scanning alert.
Configuring SonarQube
- In your SonarQube project, go to Administration > DevOps Platform Integrations > GitHub.
- Click on your GitHub App and select edit.
- Enter the webhook secret defined in your GitHub App.
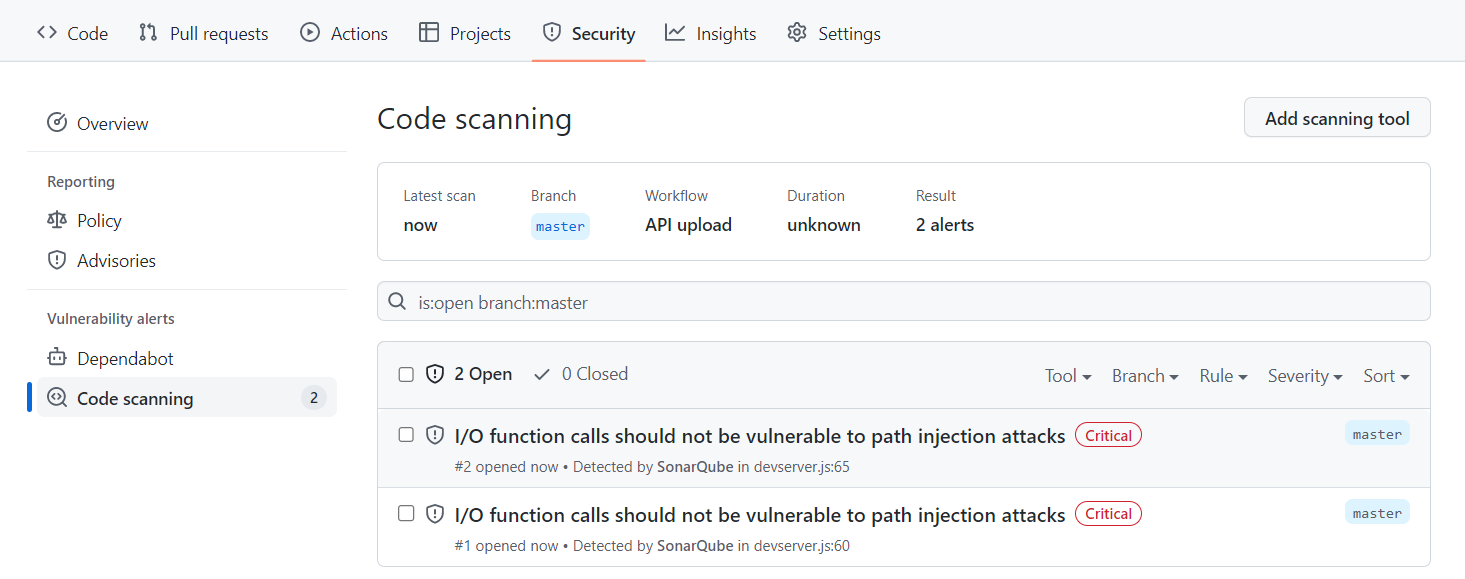
You can now analyze a project in SonarQube and check that the detected vulnerability issues are displayed on the GitHub interface, under your repository's Security > Code scanning alerts tab.
Select View alerts to see the full list:

Managing access to security alerts
In GitHub, you can configure access to security alerts for a repository to enable and disable security and analysis features.
About synchronized status changes
When you change the status of a security vulnerability in the SonarQube interface, that status change is immediately reflected in the GitHub interface.
For example, if you change an issue from Open to Resolve as false positive in SonarQube:

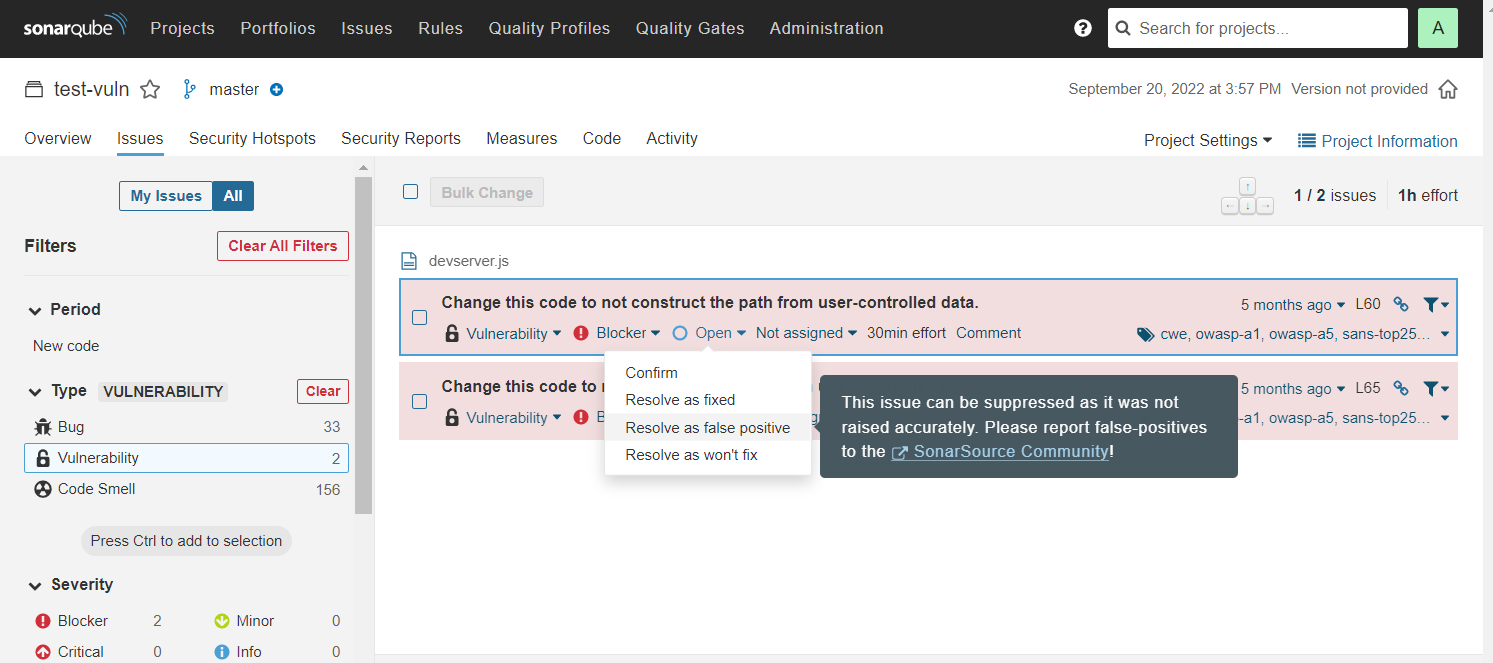
That change is reflected in the code scanning alert in GitHub as shown here:

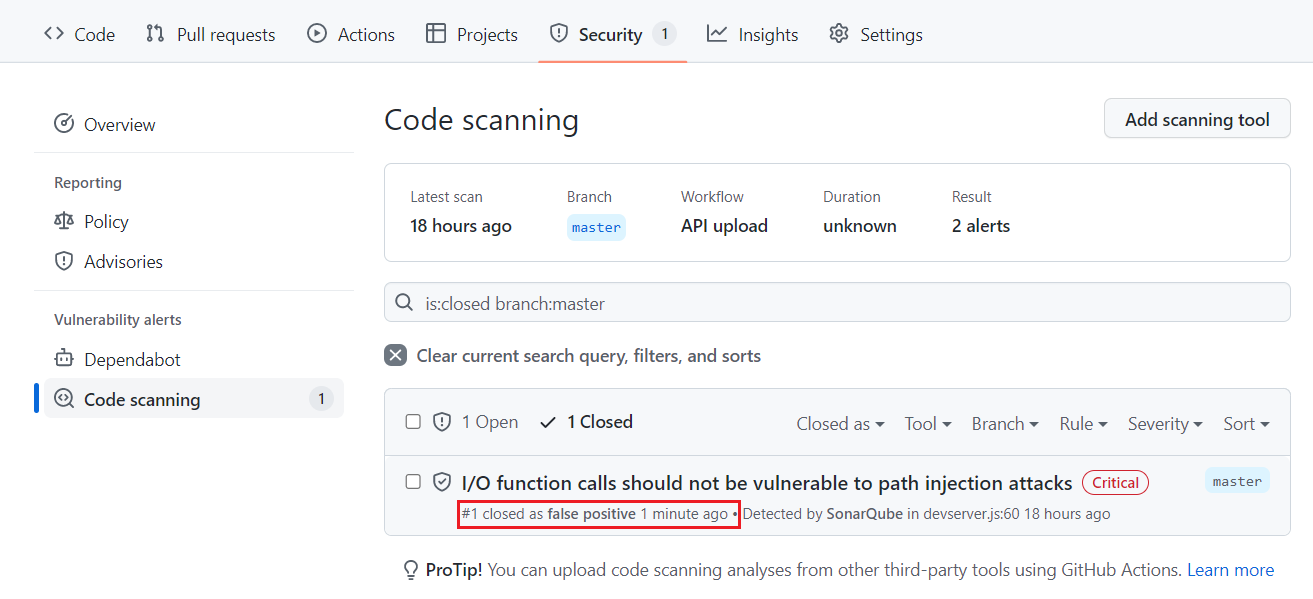
Similarly, if you change an issue from Open to Dismiss: Won't Fix in GitHub, that change is reflected in SonarQube.
Correspondence of statuses
Initially, all issues marked Open on SonarQube are marked Open on GitHub. Because the available statuses on the two systems are not exactly the same, the following logic is used to manage the transitions.
| In SonarQube, a transition to: | Results in this On GitHub: |
| Confirm | Open |
| Resolve (Fixed) | Open |
| Resolve (Won't Fix) | Dismiss: Won't Fix |
| Resolve (False Positive) | Dismiss: False positive |
| Reopened | Open |
| On Github, a transition to: | Results in this in SonarQube: |
| Dismiss: False positive | Resolve (False Positive) |
| Dismiss: Used in tests | Resolve (Won't Fix) |
| Dismiss: Won't fix | Resolve (Won't Fix) |
© 2008-2024 SonarSource SA. All rights reserved. SONAR, SONARSOURCE, SONARLINT, SONARQUBE, SONARCLOUD, and CLEAN AS YOU CODE are trademarks of SonarSource SA.